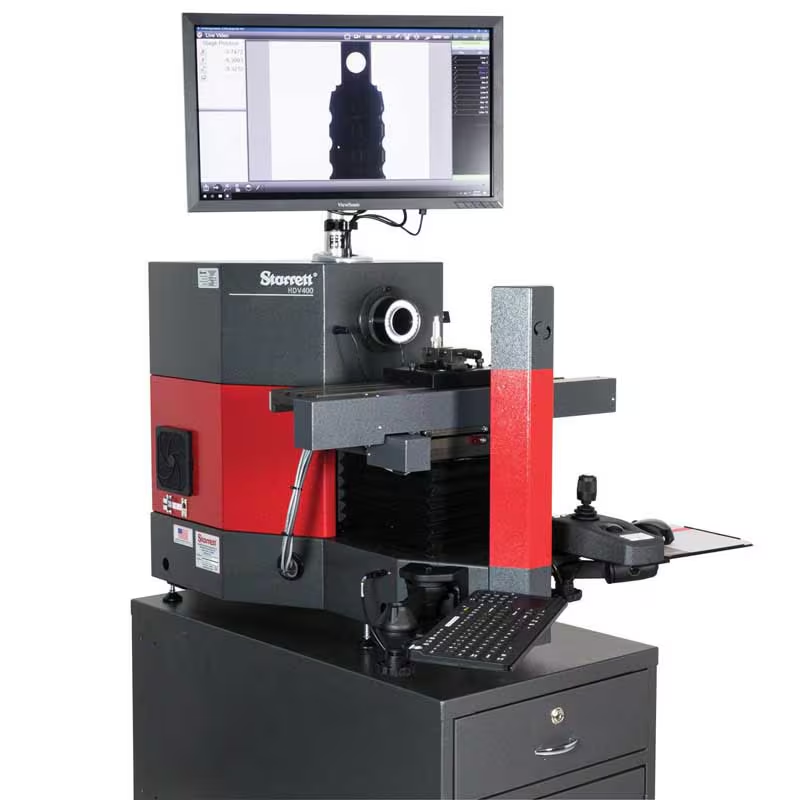
What is Starrett HDV400-M3-2LED Horizontal Digital Video System Comparator?
The Starrett HDV400-M3-2LED Horizontal Digital Video System Comparator is an advanced optical measurement system designed for high-precision dimensional inspection. It combines the traditional optical comparator’s functionality with modern digital video and software technologies to measure and analyze parts with extreme accuracy and repeatability.
Here’s a detailed technical explanation:
1. Purpose
- To perform high-precision dimensional measurements of parts by comparing them to CAD models or pre-set dimensions.
- Useful in quality control, reverse engineering, and high-accuracy inspection tasks.
2. Core Components
- Optical System:
- Equipped with a high-quality lens that projects an image of the part onto the digital video screen for measurement and analysis.
- Provides a horizontal orientation for placing and inspecting parts like shafts, gears, and flat components.
- High-Resolution Camera:
- Captures precise digital images of the part for analysis.
- Offers magnification levels to ensure small features and details are accurately measured.
- LED Illumination:
- Dual LED Light Sources:
- Front LED (for surface illumination).
- Rear LED (for profile illumination).
- Ensures even and consistent lighting for accurate image capture.
- Dual LED Light Sources:
- Digital Display and Video Overlay:
- The comparator features a high-resolution monitor displaying the live video feed.
- Supports real-time overlay of CAD files, enabling direct comparison between the part and its design.
- Measurement Stage:
- A robust and precise stage that allows for smooth and controlled movement of the part.
- Stages are motorized or manual, depending on the configuration, with micron-level precision for positioning.
- Software System:
- Integrated MetLogix M3 Software, designed for advanced measurement and analysis.
- Features:
- CAD import and overlay.
- Automated edge detection for accurate measurements.
- Measurement data recording and reporting.
- Offers programmable measurement routines for repeatable tasks.
- Frame and Build:
- Heavy-duty construction to minimize vibrations and maintain stability during precise measurements.
- Designed to handle parts of varying weights and sizes.
3. Working Principle
- Part Placement:
- The part to be inspected is placed on the measurement stage, aligning it with the optical system.
- Image Capture:
- The high-resolution camera captures the profile or surface image of the part using optimal illumination settings.
- Measurement and Analysis:
- The system overlays the part’s image with a CAD model or predefined geometry for comparison.
- The software detects edges and calculates dimensions such as length, diameter, angles, and radii.
- Data Output:
- Measurement data is displayed on the screen and can be exported for documentation or further analysis.
4. Technical Features
- Measurement Capabilities:
- Measures dimensions such as lengths, diameters, radii, and angles with micron-level accuracy.
- Supports both profile and surface measurements.
- Camera Resolution:
- High-resolution camera ensures clear image capture, even for small or intricate parts.
- Field of View (FOV):
- Large enough to accommodate medium-sized parts while maintaining fine detail for smaller features.
- Illumination Control:
- Adjustable LED lighting ensures optimal contrast for edge detection.
- Precision Stage:
- Allows for precise X, Y, and Z-axis movements with repeatability in the micron range.
- Software Features:
- Automated feature recognition.
- CAD overlay with DXF file compatibility.
- Statistical process control (SPC) reporting.
5. Applications
- Aerospace and Automotive:
- Inspection of complex geometries and tight-tolerance components like gears and shafts.
- Medical Devices:
- Measuring precision parts used in surgical instruments or implants.
- Machining and Manufacturing:
- Quality control for machined parts, ensuring compliance with design specifications.
- Tool and Die:
- Inspecting cutting tools, molds, and other precision components.
6. Advantages
- Precision:
- Offers high accuracy and repeatability, ideal for critical inspection tasks.
- Efficiency:
- Automates many measurement processes, reducing time and manual effort.
- Versatility:
- Measures a wide variety of part types and sizes, from small intricate features to larger components.
- Digital Integration:
- CAD compatibility streamlines comparisons and reduces human error.
- User-Friendly:
- Software interface simplifies programming and operation for users of varying skill levels.
7. Typical Specifications
| Feature | Specification |
|---|---|
| Measurement Range | X/Y: 400 mm / 200 mm (typical) |
| Camera Resolution | High-resolution digital camera |
| Stage Accuracy | ±0.005 mm |
| Illumination | Dual LED (front and rear) |
| Software | MetLogix M3 |
| Supported CAD Files | DXF |
| Display | High-resolution monitor |
| Magnification | Variable, software-controlled |
Conclusion
The Starrett HDV400-M3-2LED is a cutting-edge digital optical comparator designed for high-precision, automated inspection tasks. Its combination of traditional optical measurement techniques with advanced digital technologies makes it a versatile and indispensable tool in modern manufacturing and quality control environments.


